| This document is under development! |
The c64lib is a set of Kick Assembler macros grouped in several libraries.
They are the building blocks that can be reused in retro projects.
The intention behind c64lib is to provide retro community with modern development tools such as build support, CI assistance, dependency management, artifact versioning and comprehensive documentation.
The c64lib is hosted on GitHub: https://github.com/c64lib/.
1. Overview
The c64lib project consists of multiple libraries.
Each library is hosted as separate GitHub repository and is plugged into CircleCI build system for Continuous Integration.
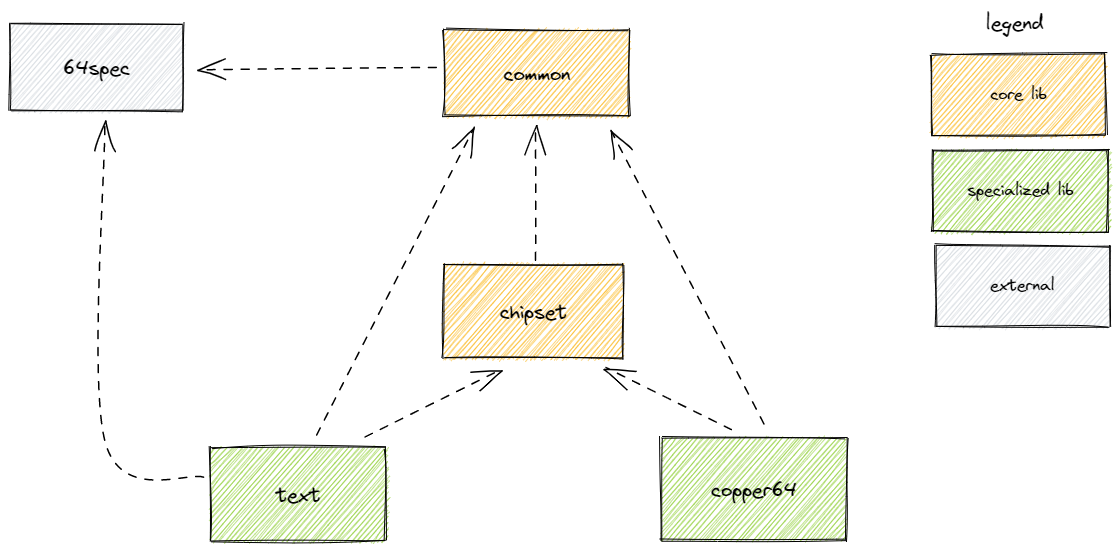
There are following core libraries:
- common
-
The one that hosts some commonly used functions, macros and subroutines; no other
c64liblibrary can work without it. This code is intended to be platform-independent, it complies to typical MOS 6502 assembler syntax (except it is written in KickAss, which is C64 specific at the moment). - chipset
-
The one that hosts code that is platform specific and is dedicated to handle typical C64 chipset such as VIC-II, SID, CIA as well as typical C64 memory layout.
- text
-
The one that handles displaying text in text mode of Commodore 64 / VIC-II.
- copper64
-
Utility library that makes raster interrupt programming on VIC-II pleasant and easy.
The diagram below describes dependencies between internal libraries of c64lib project. There is also an excellent 64spec testing library used and shown as external reference.
2. Installation
The c64lib is a set of libraries that can be used in assembly programs written with Kick Assembler.
Each library consists of one or more source files that shall be then imported in Kick Assembler program.
There are several methods of downloading and "installation" of libraries, some of them will be presented there starting from the most convenient one.
2.1. Using Gradle as a build tool
The easiest way to use c64lib is to add the libraries as dependencies to the gradle build.
It is an easy task due to Retro Build Tool.
The complete manual for Retro Build Tool is available at: https://c64lib.github.io/gradle-retro-assembler-plugin/.
2.1.1. When Gradle is already used
Well, when you are a happy user of Retro Assembler plugin, then you are even happier, because it’s extremely easy to add C64Lib to your project.
The c64lib is a GitHub project, so it can be added as GitHub dependency to your gradle.build file.
Put the following lines into your retroProject section of the build file:
libFromGitHub "c64lib/common", "0.4.0"
libFromGitHub "c64lib/chipset", "0.4.0"
libFromGitHub "c64lib/text", "0.4.0"
libFromGitHub "c64lib/copper64", "0.4.0"
Then you will be able to use all four libraries from c64lib.
Of course not all four are mandatory.
You can use any subset of them as long as you obey dependency graph as shown in Overview.
Retro Assembler plugin downloads all dependencies into default location:
.ga/deps
All libraries from c64lib will be downloaded under c64lib subfolder therefore the following location:
.ga/deps/c64lib
must be added to the lib dir so that Kick Assembler will see them when interpreting #import directive.
The following must be also a part of your gradle.build file:
libDirs = [".ra/deps/c64lib"]The complete gradle.build will be following:
plugins {
    id "com.github.c64lib.retro-assembler" version "1.6.0"
}

retroProject {
    dialect = "KickAssembler"
    dialectVersion = "5.25"
    libDirs = [".ra/deps/c64lib"]

    libFromGitHub "c64lib/common", "0.4.0"
    libFromGitHub "c64lib/chipset", "0.4.0"
    libFromGitHub "c64lib/text", "0.4.0"
    libFromGitHub "c64lib/copper64", "0.4.0"
}
In order to build your executable you just need to execute gradle:
./gradlewor
./gradlew buildIn result C64 executables (a prg files) will be created.
2.1.2. When Gradle is not used
but you really want to start using it, you have to enable it first. Following steps are requires as preconditions:
-
Download and install JDK 8 or higher.
-
Download and install Gradle.
Once it is done, you have to restart your console/terminal application and go to your project location. In your location you run Gradle to install a wrapper:
gradle wrapperthen you add gradle.build file using following content (or similar):
plugins {
    id "com.github.c64lib.retro-assembler" version "1.6.0"
}

retroProject {
    dialect = "KickAssembler"
    dialectVersion = "5.25"
    libDirs = [".ra/deps/c64lib"]

    libFromGitHub "c64lib/common", "0.4.0"
    libFromGitHub "c64lib/chipset", "0.4.0"
    libFromGitHub "c64lib/text", "0.4.0"
    libFromGitHub "c64lib/copper64", "0.4.0"
}
Of course, the set of used libraries (with libFromGitHub element) may vary as well as the version of Kick Assembler.
And that’s it: from now on you are able to build your project using simple gradlew or gradlew build commands. It’s not even necessary to have Gradle installed. All you need is Java 8 or higher.
2.2. Manual clone from GitHub
If you don’t want to or cannot use Retro Assembler plugin, you can use your git client and clone libraries manually and then just point the location with -libdir parameter of the KickAss.
Lets assume your project has following directory layout on the disk:
work
  |--libs
  +--project
       |--SomeFile.asm
       +--SomeOtherFile.asm
Then you go to the libs directory (cd work/libs), and then clone as many libraries from c64lib as you need:
git clone https://github.com/c64lib/common.git
git clone https://github.com/c64lib/chipset.git
git clone https://github.com/c64lib/text.git
git clone https://github.com/c64lib/copper64.git
This will checkout latest released version of the library (actually a top of the master branch, which usually means the same).
In result, you will get something like this:
work
  |--libs
  |    +--common
  |         +--lib
  |              |--common.asm
  |              |--invoke.asm
  |              |--invoke-global.asm
  |              |--math.asm
  |              |--math-global.asm
  |              |--mem.asm
  |              +--mem-global.asm
  |    +--chipset
  |         |--...
  |    +--text
  |         |--...
  |    +--copper64
  |         |--...
  +--project
       |--SomeFile.asm
       +--SomeOtherFile.asm
If you then specify -libdir parameter to the KickAss appropriately, you’ll be able to use the libs (asm files in lib directory) with simple #import directive, i.e.:
#import "common/lib/math-global.asm"
As mentioned earlier, checkout from master branch ensures that last released version of library is used.
If you want to change it and use concrete version from the past, after git clone you have to enter the cloned directory (i.e. cd common) and checkout desired version:
git checkout 0.4.0(for version 0.4.0).
Assembling is then possible with manual invocation of Kick Assembler:
java -jar c:\ka\KickAss.jar -libdir ../libs SomeFile.asm
java -jar c:\ka\KickAss.jar -libdir ../libs SomeOtherFile.asm
2.3. Manual copy
Least desired method of installation of c64lib is to download source code of given version and unzipping it into target directory.
It is not a very convenient method, but it does not require Gradle nor Git to be installed on your computer.
For every library module you have to visit GitHub and open Releases tab:
https://github.com/c64lib/common/releases/tag/0.1.0
Under assets, you will see zipped content of the library. Download it and unzip into desired location, i.e. into libs directory.
In result, you end up with a similar layout as with "Git clone" method (see above).
You use exactly the same method to use library in your source code, i.e.:
#import "common/lib/invoke_global.asm"
and you invoke Kick Assembler using the same syntax:
java -jar c:\ka\KickAss.jar -libdir ../libs SomeFile.asmassuming, that your libs directory exists on the same level as your project directory.
3. Building blocks
3.1. The c64lib namespace
Each element mentioned in this section are declared inside c64lib namespace.
This is to avoid potential name clashes with other libraries and/or with client assembly programs.
Kick Assembler allows to access namespaced objects via c64lib. prefix, but this, unfortunately, works for labels only.
All other elements such as functions and macros can be only accessed from within c64lib namespace.
3.2. Global imports
If accessing elements via c64lib namespace is, by any reason, not possible nor convenient, there are also so-called "global" declarations, where certain elements of the library are exposed with global names (thus accessible in global namespace).
All such global declarations have names prefixed with c64lib_ prefix, to avoid name clashes.
3.3. Labels
A label is a value tagged with name. Labels are used to give symbolic names to values denoting addresses, registers or constants. Labels are useful to define memory locations and are widely used in chipset library:
.label VIC2                 = $D000
.label SPRITE_0_X           = VIC2 + $00
.label SPRITE_0_Y           = VIC2 + $01
.label SPRITE_1_X           = VIC2 + $02
.label SPRITE_1_Y           = VIC2 + $03
.label SPRITE_2_X           = VIC2 + $04
.label SPRITE_2_Y           = VIC2 + $05
Labels are always declared inside c64lib namespace.
Labels can be reached outside c64lib namespace by prefixing their names with namespace name (labels are the only elements that can be accessed that way due to Kick Assembler limitations).
For example, at any time it is legal to write:
lda #100
sta c64lib.SPRITE_0_X
3.4. Functions
A function is an element of Kick Assembler that is declared using .function keyword.
Functions does not assemble into any machine code - they are used by assembler to evaluate values that can be then used in other functions, macros or to assembly a code.
.function neg(value) {
    .return value ^ $FF
}
/*
* Params:
* video: location of video ram: 0..15
* bitmap: location of bitmap definition: 0..1
*/
.function getBitmapMemory(video, bitmap) {
    .return bitmap<<3 | video<<4
}
Functions are always declared inside c64lib namespace.
Functions are declared in files .asm files located under lib directory.
3.5. Macros
A macro is an element of Kick Assembler that is declared using .macro directive.
Once used, macro is replaced with assembly code defining it.
Macros can be parametrised (that is, they can take an argument, or even more arguments) - this parametrisation can affect the code being generated.
It is noteworthy that macro is not an equivalent of subroutine, even though it looks similar to one from syntactic point of view. When macro is “called”:
someFancyMacro(parameter1, parameter2)
it does not mean, that your code will jump into place where macro someFancyMacro is declared, pass both parameters and return from that place once execution is finished.
Instead, an assembler will paste code declared inside macro substituting parameters with values provided as parameter1 and parameter2.
Under some circumstances you can use macros as subroutines. This may be fast, because there is no subroutine calling overhead. This will however consume a lot of memory (in sense of generated machine code) if not used wisely.
Macros are declared in .asm files located under lib directory.
3.6. Subroutines
Subroutine is a consistent set of assembly instructions that performs concrete operation. The major difference between plain macro and subroutine is that macro is used to substitute commonly used patterns of intructions (at cost of growing machine code size) and subroutine is used to save on machine code size actually.
3.6.1. Regular subroutines
As subroutine we understand a piece of ML code that can be used by jumping there with jsr operation.
A subroutine always ends with rts which means that at the end of execution program counter will be restored to the position right after original jsr operation and code execution will continue.
In this sense a subroutine is an equivalent of procedure, function or method in high level programming languages.
Kick Assembler as such does not provide any special means to create subroutines as it is just a macro assembler.
With c64lib we basically share subroutine code just by writing piece of asm code and place it in separate source files.
Subroutines are declared in .asm files located under lib/dir subdirectory.
Each subroutine consists of appropriate rts operation so that it should always be accessed with corresponding jsr operation.
If soubroutine consumes input parameters, they should be set accordingly before jsr is executed.
Depending on the parameter passing method it should be either register setup (that is A, X or Y), memory location setup or pushing to the stack.
For stack method there is a convenience library invoke available.
A subroutine code should be imported in place where it needs to be located - we don’t do it at the top of the source file but rather we use #import directive exactly in place where we want to have our subroutine.
Lets consider copyLargeMemForward subroutine as an example.
We have to label a place in memory where the subroutine will start and then import the subroutine itself:
copyMemFwd:
    #import "common/lib/sub/copyLargeMemForward.asm"
The subroutine takes three parameters using stack passing method:
-
Stack WORD - source address
-
Stack WORD - target address
-
Stack WORD - size
So, before calling subroutine, you have to push 6 bytes to the stack. The easiest way to do it is to use invoke library:
#import "common/lib/invoke-global.asm"
and then:
c64lib_pushParamW(sourceAddress)
c64lib_pushParamW(destinationAddress)
c64lib_pushParamW(amountOfBytesToCopy)
jsr copyMemFwd
In result a subroutine will be called and amountOfBytesToCopy bytes will be copied from sourceAddress location to the destinationAddress location.
3.6.2. Macro-hosted subroutines
Some subroutines use this convenient method of distribution. Instead of being declared in separate source file, they are declared where macros and functions are declared - in library source files itself.
Macro-hosted subroutines are used when further parametrisation is needed before subroutine is ready to use. Usually there are some variants that can be turned on or off (in such case such macro can be called multiple times thus generating multiple versions of subroutine). Sometimes subroutine requires some zero-page addresses that we don’t want to hardcode in the library - it would be then up to the user to parametrise subroutine with addresses of choice.
Let’s consider scroll1x1:
This subroutine requires three parameters being passed via stack but also needs two consecutive bytes on zero page for functioning (indirect addressing is used). Let’s assume we will use address 4 and 5 for this purpose.
#import "text/lib/scroll1x1.asm"
#import "common/lib/invoke.asm"
...
.namespace c64lib {
    pushParamW(screenAddress)
    pushParamW(textAddress)
    pushParamWInd(scrollPtr)
}
jsr scroll
...
scroll: .namespace c64lib { scroll1x1(4) }
So, the scroll subroutine is configured for address 4 (and 5), and installed under address denoted by scroll label.
It can be then normally called with jsr scroll.
Before calling input parameters need to be pushed to the stack.
It is done via pushParamW macros (for address values) and pushParamWInd (to extract value from memory location pointed by parameter).
4. Functional guidelines
4.1. Subroutines
4.2. Passing parameters to subroutines
In most cases a subroutine requires one or more input parameters. Number of parameters is basically unlimited. The size of each parameters can also vary (however usually it is 1 or 2 bytes). There are three methods of passing such parameters to the subroutine:
-
Using CPU registers.
-
Using fixed memory locations.
-
Using call stack.
The "CPU regs" method is the simplest and the most efficient, however, due to limited number and size of MOS 6502 registers (A, X, Y, each 1 byte in size) its application is very limited.
The "Fixed memory locations" method does not have this size limitation and also, when using zero page, can be quite performant. This method can be rather tricky in application, because memory locations must be carefully choosen not to clash between different, possibly cooperating subs. The most pragmatic approach to this method is to use Macro-hosted subroutines, where these fixed memory locations can be configured via macro attributes.
The "call stack" method uses CPU stack located at page 1 to pass parameters.
This way it is possible to pass more data than via CPU regs method and does not require fixed memory locations to be used.
The stack size is of course very limited (256 bytes max, but each jsr consumes at least 3 bytes).
It is possible and quite often useful to combine "CPU regs" and "Call stack" method: some arguments are passed via registers and some via stack. We’ll call this method a hybrid invocation.
4.2.1. Support for call stack parameters passing
The common library contains helper macros for parameter passing via the stack.
Recursive calls to the subroutines are not supported.
-
c64lib/common/lib/invoke.asm. -
c64lib/common/lin/invoke-global.asm.
Parameters should be pushed onto the stack just before calling subroutine (which is done via jsr instruction).
Within the subroutine, parameters must be fetched from the stack in reverse order and stored elsewhere.
Before this is done, a return pointer must be preserved in order to enable return from the subroutine (a rts instruction).
There are four macros for pushing parameters to the subroutine:
pushParamB-
Pushes single byte as a parameter. The byte is provided via macro parameter.
pushParamW-
Pushes two bytes as a parameter. The word is provided via macro parameter.
pushParamBInd-
Pushes single byte as a parameter. The address of this byte is provided via macro parameter.
pushParamWInd-
Pushes two bytes as a parameter. The starting address of this two-byte value is provided via macro parameter.
All these macros are destroying A register, that should be considered when using hybrid invocation (first push params via macros, last set the A parameter value).
copyLargeMemForward invocation.The copyLargeMemForward subroutine copies up to 64K of data from one memory location to another memory location.
These memory locations can overlap as long as we copy from lower address to higher address.
This subroutine uses call stack invocation method and requires 6 bytes of input parameters:
-
Source data address.
-
Destination address.
-
Data size.
Let’s assume we want to copy 1024 bytes from $3000 to $4000. Example of the subroutine invocation is following:
pushParamW($3000)
pushParamW($4000)
pushParamW(1024)
jsr copyLargeMemForward
The subroutine, once being called, must do the following:
-
Pull return address from the stack and store it in temporary place.
-
Pull all parameters from the stack in reverse order and store them in some internal placeholders.
-
Push return address back to the stack.
Preserving and restoring of return address may be done via invokeStackBegin and invokeStackEnd macros.
Each of these macros takes single argument that denotes temporary address of 2-byte large placeholder where return address can be preserved.
The invokeStackBegin should be called before any parameter is pulled from the stack.
The invokeStackEnd should be called before a rts instruction is called.
There are three macros for pulling parameters from the stack (remember to call them in reverse order, this is how the stack works):
pullParamB-
Pulls a single byte from the stack and stores it under address given as a macro parameter.
pullParamW-
Pulls two bytes from the stack and stores them under address given as a macro parameter.
pullParamWList-
Pulls two bytes from the stack and stores them under multiple addresses provided as an input parameter list.
rotateMemRight subroutine implementation.The rotateMemRight subroutine rotates up to 256 bytes of the memory to the right.
It uses hybrid invocation: a memory address (2 bytes) should be passed via stack, and size of the memory window should be set into X register.
It uses self modifying code technique and copies input address directly into four address location in its own code.
  rotateMemRight: {

  invokeStackBegin(returnPtr)
  pullParamWList(List().add(loadFirst, loadNext, staNext, staLast))

  lda loadFirst:$ffff, x
  sta preserve
  loop:
    dex
    lda loadNext:$ffff, x
    inx
    sta staNext:$ffff, x
    dex
  bne loop
  lda preserve
  sta staLast:$ffff

  invokeStackEnd(returnPtr)
  rts
  // local vars
  returnPtr:      .word 0
  preserve:       .byte 0
  }
It is noteworthy, that semi-local variables are declared as additional 3 bytes at the end of the subroutine (guarded by preceding rts instruction).
These variables are used to preserve return address and additional single byte for rotation.
4.3. Memory operations
The common library helper macros helps with common memory related operations.
-
c64lib/common/lib/mem.asm. -
c64lib/common/lib/mem-global.asm.
4.3.1. Setting the memory
There are a bunch of set* pseudocommands that can be used to quickly set given memory cells to some value.
The set8 works with 1-byte values, the set16 works with 2-byte values (words).
The following sets content of memory address $B000 to 0:
set8 #0 : $B000The following sets content of memory address $C000 to a value stored under address $0F:
set8 $0F : $B000It is also possible to set two consecutive bytes to a given 2-byte value, but one needs to use the following macro for that (sets $B000 to $02 and $B001 to $01):
set16($0102, $B000)There is also a macro for setting one byte value which can be used as long as immediate addressing is needed:
set8($01, $B000)In order to fill specified memory block with given value a fillMem subroutine can be used.
In order to use this subroutine import it and place a label before it so it can be called later.
fillMem: #import "common/lib/sub/fill-mem.asm"This subroutine uses hybrid invocation, push start address of the memory block into the stack and set value in A and block size in X.
As you see, this subroutine is limited to 255 as maximum size of the block.
The following code can be used to fill 200 bytes of memory starting from $B000 address with value 0.
pushParamW($B000)
lda #0
ldx #200
jsr fillMem
4.3.2. Memory transfer
You can use copy8 pseudocommand to copy one byte from one place to another using A:
copy8 $B000:$C000You can use copy16 pseudocommand to copy two consecuive bytes from one place to another:
copy16 $B000:$C000For fast, unrolled copying of data block use copyFast macro.
To copy 20 bytes from $B000 to $C000 use the following:
copyFast($B000, $C000, 20)Remember, that copyFast macro will consume a lot of space if count parameter (the last one) will be big.
There is a "slow" copy subroutine that is handy for "unpacking" a PRG file and moving arbitrary sized blocks of data to the target location. This subroutine can be used to move SID data (music) into target location as well as to move VIC-II data (charsets, sprites) into the VIC-II addressable bank. Target and source spaces can overlap as long as target address is bigger than source address.
In order to use this subroutine import it and place a label before, so that it can be called later.
copyLargeMemForward: #import "common/lib/sub/copy-large-mem-forward.asm"This subroutine requires three WORD parameters to be placed on stack: * source address * target address * data size (can be more than 256)
pushParamW($A000)
pushParamW($E000)
pushParamW(1024)
jsr copyLargeMemForward
4.4. 16-bit math
The common library helper macros helps with common math related operations.
They "extend" a basic set of math opcodes used to do arithmetics with macros and pseudocommands that operates on two-byte sized values (words).
-
c64lib/common/lib/math.asm. -
c64lib/common/lib/math-global.asm.
4.4.1. Increments, decrements
You can easily increment and decrement 16-bit counters using following macros:
inc16($2000) // increments counter located in $2000,$2001dec16($3000) // decrements counter located in $3000,$30014.4.2. Adding, subtraction
You can add / subtract value to / from a value stored in memory via add16 and sub16 macros.
In example to add 315 to the value stored under $B000:
add16(315, $B000)Alternatively you can use add16 and sub16 pseudocommands:
add16 $B000 : $C000You can add / subtract value stored in one memory address to / from a value stored in another memory address via addMem16 and subMem16, respectively.
In example to add value from address $B000:$B001 to the value from address $C000:$C001:
addMem16($B000, $C000)4.5. Far conditional jumps
Well known limitation of MOS 6502 machine code is that conditional jump instructions use 1 byte for relative jump shift. This means that if you want to jump too far, you have to use conditional / absolute jump combination, which is cumbersome.
-
c64lib/common/lib/common.asm. -
c64lib/common/lib/common-global.asm.
The c64lib offers few macros that can simplify this task:
- fbne(label)
-
It calculates the jump length and if it is too far it replaces simple
bnewithbeq/jmpcombination. - fbmi(label)
-
It calculates the jump length and if it is too far it replaces simple
bmiwithbpl/beq`jmp` combination.
4.6. Handling of RLE compression
The c64lib supports very basic yet useful compression method called RLE.
It is particularly useful for data consisting of repetitive patterns of bytes such as simple graphics, game maps and so on.
-
c64lib/common/lib/compress.asm -
c64lib/common/lib/compress-global.asm
One can call compressRLE(data) macro that crunches provided data during compilation of program.
Such data must be loaded with LoadBinary(filename) function.
Compressed data can be decompressed (and relocated) with decompressRLE subroutine.
decompressRLE: #import "common/lib/sub/decompress_rle.asm"This subroutine requires three WORD parameters to be placed on stack: * source address * target address
.var data = LoadBinary("data-to-be-compressed.bin")

sourceAddress: c64lib_compressRLE(data)

// ...

pushParamW(sourceAddress)
pushParamW(targetAddress)
jsr decompressRLE

// ...

targetAddress:
4.7. Commodore 64 memory layout management
The Commodore 64 is known to have extremely flexible memory layout configuration.
The c64lib library provides simple macro to change memory configuration in single line of code.
-
c64lib/chipset/lib/mos6510.asm. -
c64lib/chipset/lib/mos6510-global.asm.
To change memory configuration one can run configureMemory(config) macro, where config can have one of the following values:
-
RAM_RAM_RAM -
RAM_CHAR_RAM -
RAM_CHAR_KERNAL -
BASIC_CHAR_KERNAL -
RAM_IO_RAM -
RAM_IO_KERNAL -
BASIC_IO_KERNAL
The BASIC_IO_KERNAL is an initial value after C64 is being powered on.
Names of the labels above are self explanatory: each section represents one of switchable region: RAM or BASIC, RAM/IO/CHARSET and RAM or KERNAL.
You usually don’t need BASIC and KERNAL but still want IO region to be banked in.
You have to ensure that interrupts are disabled during configuration process. You would like to disable default interrupt sources (as KERNAL is banked out the interrupt vectors are too).
sei
c64lib_disableNMI()
c64lib_configureMemory(c64lib.RAM_IO_RAM)
c64lib_disableCIAInterrupts()
cli
4.8. VIC-II memory management
4.8.1. Configuring VIC-II memory bank
Configuration of which one out of four C64 memory banks is addressable by VIC-II chip can be done via reprogramming the CIA-2 chip.
-
c64lib/chipset/lib/cia.asm. -
c64lib/chipset/lib/cia-global.asm.
The change can be done via setVICBank`c64lib_setVICBank` macro.
The following code:
c64lib_setVICBank(c64lib.BANK3)sets up the last memory bank ($C000-$FFFF) for VIC-II graphic chip.
4.8.2. VIC-II memory layout management
There are two distinct memory areas that have to be fconfigured for VIC-II. Their meaning is different depending on the screen mode. For text modes it would be screen memory and charset memory. For bitmap modes it would be screen memory and bitmap memory.
4.9. VIC-II NTSC detection
4.10. VIC-II IRQ handling
4.11. Text outputting
The text library offers macros and subroutines to output texts and numbers.
-
c64lib/text/lib/text.asm. -
c64lib/text/lib/text-global.asm. -
c64lib/text/lib/sub/out-hex-nibble.asm. -
c64lib/text/lib/sub/out-hex.asm.
The outTextXYC outputs text terminated with $FF that is no longer than 255 characters.
As it is a macro-hosted subroutine, it must be instantiated with screen and color RAM addresses first.
Such subroutine can be then used to output different texts at different screen position and with different color.
myOutTextXYC: c64lib_outTextXYC($1000, $D800)

text: .text "Commodore 64"; .byte $ff

c64lib_pushParamW(text)
ldx #5
ldy #12
lda #LIGHT_GREEN
jsr myOutTextXYC
The outNumberXYC outputs two digit number (a byte).
As this is a macro-hosted subroutine, it must be instantiated with screen and color RAM addresses first.
Such subroutine can be then used to output numbers at different screen position and with different color.
This subroutine displays bytes in hexadecimal form unless number is BCD packed.
myOutNumberXYC: c64lib_outNumberXYC($1000, $D800)

number: .byte 3*16 + 6

c64lib_pushParamW(number)
ldx #5
ldy #12
lda #LIGHT_GREEN
jsr myOutNumberXYC // displays 36 at (5,12) using light green color
4.12. Text scrolling
coming soon
4.13. 2x2 scrollable background
coming soon
5. Copper 64
The Coppper 64 library is a tool that eases complex raster-related effects that can be achieved by Commodore 64.
Raster-related effects are all effects that are triggered at certain raster line. The Commodore 64 and its VIC-II chip can be programmed in a way so that CPU is interrupted once certain raster line of the screen is drawn by CRT (or LCD). If this interrupt then performs certain actions, sometimes even by reprogramming of VIC-II itself, a wide variety of interesting effects can be achieved:
-
splitting the screen into two or more pieces each using different screen mode or addressing,
-
extending amount of visible colours by changing global colour registers of VIC-II,
-
extending amount of visible sprites by reusing eight available sprite slots in different regions of the screen (so-called sprite multiplexing),
-
displaying colorful raster bars or achieving "rainbow fonts",
-
performing certain video-RAM operations at given moments to achieve smooth scrolling,
-
doing any "background task" that requires regular update such as playing music or incrementing timers,
-
and many more…
Usually you need to perform various raster-relation actions at once, on single screen. This means that you need to perform several different handling code for several different raster times. Unfortunately, the VIC-II chip and its interrupt system allows just to specify single raster value at a time - that is, you can only trigger an interrupt at single line.
This is a limitation that can be overcame: all you need to do is to reprogram VIC-II raster register at the end of interrupt handling method, maybe also reprogram IRQ vector of MOS 6502 so that the VIC-II will execute second IRQ handler at second position. Of course, you have to reprogram raster register at the end of the second IRQ handler, the same needs to be done for IRQ vector. This way you have two distinct IRQ handlers fired at two distinct raster positions.
This approach can be generalized to N handlers and raster positions. Of course at each time you have to ensure that:
-
Raster position grows except the very last position which should reset to the lowest raster at the end.
-
You have to ensure that IRQ handler have enough time to execute itself (the next raster position must be big enough so that we have enough cycles to execute the whole IRQ handler).
Not conforming to any of the rules above results in effect called "frame-skips", that is the VIC-II will display the whole frame before next handler will be run.
Futhermore, the MOS 6502 are unstable by default, that is, it is usually hard to predict when exactly the code execution by the CPU will be interrupted. Some visual effects are affected by this problem, prominently screen splits and raster bars. Special programming techniques including code cycling and double interrupts are used to mitigate this problem.
The Copper 64 library solves most of these problems. It is configured via special table allowing to specify various effects being triggered at raster lines. The design of this library has been inspired by Amiga’s Copper chip (and so-called Copper list) or 8-bit Atari’s display list.
-
c64lib/copper64/lib/copper64.asm. -
c64lib/copper64/lin/copper64-global.asm.
5.1. Defining Copper table
Copper table is a block of memory containing copper entries, 4 bytes each.
| Byte offset | Name | Description |
|---|---|---|
0 |
Control |
Control byte serving different purposes (see below). |
1 |
Raster |
Lower 8 bits of raster line address. |
2 |
Data 1 |
First byte of data. |
3 |
Data 2 |
Second byte of data. |
The control byte has multiple purposes depending on its value:
| Control value | Description |
|---|---|
|
Stop execution of the copper list. |
|
End of the copper list (start from the beginning - loop). |
|
Execute function (see below). |
For values from range $01 - $FE the bits of the control byte have following meanings.
| Bit | Description |
|---|---|
|
Nineth bit of the raster line address. |
|
Reserved, should be 0. |
|
Reserved, should be 0. |
|
IRQ Function - 1..31. |
There are two macros that can be used to simplify copper table definition:
copperEntry-
Creates single effect line of copper list. This macro takes following arguments:
raster- raster counter (9 bits),function- IRQ handler code,data1- first byte of function data,data2- second byte of function data. copperLoop-
Is used to finish copper list - the copper 64 wraps to the first line once loop line is detected. This macro does not take any arguments.
5.2. Copper 64 main subroutine
The main Copper 64 subroutine must be preconfigured using hosted subroutine approach.
Copper 64 requires three bytes from zero page: two subsequent bytes to store copper list address and one byte for copper list pointer.
Install main subroutine with following macro call:
.label COPPER_LIST_ADDR = $10
.label COPPER_LIST_PTR = $12

startCopper(
    COPPER_LIST_ADDR,
    COPPER_LIST_PTR,
    List().add(c64lib.IRQH_JSR, c64lib.IRQH_BG_RASTER_BAR, c64lib.IRQH_BG_COL_0).lock())
Note that all three location on the zero page can be freely configured via first and second parameter of the macro call.
As the third argument you have to pass a locked list of all IRQ handlers you are going to use in copper list. That is, even though Copper 64 supports more than dozen of different effects, only few of them can be used at once (this limitation is caused by the fact, that Copper 64 is cycled to achieve stable effects, therefore all handlers must fit into single page of memory).
Once hosted subroutine is installed and configured, you can make call to it, ensuring that firstly you set up copper list address into appropriate zero page location. This way you can easily reuse the same main subroutine for different copper list, this works well as long as you use the same set of IRQ handlers in all of these lists. If by any reason you cannot use the same list of IRQ handlers (because i.e. they do not fit into 256 bytes of memory), you have to configure and install main subroutine twice.
5.3. Stop Copper 64 subroutine
Basically you have to stop IRQ to have Copper 64 deactivated, or reprogram IRQ vector, or both. You can use the following macro to just turn VIC-II initiated IRQ off:
stopCopper()5.4. Copper 64 effects
5.4.1. Set border color
Changes border color.
-
Handler label:
IRQH_BORDER_COL -
Handler code:
1 -
Argument 1: desired border color;
0..15 -
Argument 2: unused
-
Cycled: yes (PAL, 63 cycles)
Usage:
copperEntry(<raster>, c64lib.IRQH_BORDER_COL, <color>, 0)5.4.2. Set background color 0
Changes background color 0.
-
Handler label:
IRQH_BG_COL_0 -
Handler code:
2 -
Argument 1: desired background 0 color;
0..15 -
Argument 2: unused
-
Cycled: yes (PAL, 63 cycles)
Usage:
copperEntry(<raster>, c64lib.IRQH_BG_COL_0, <color>, 0)5.4.3. Set background color 1
Changes background color 1.
-
Handler label:
IRQH_BG_COL_1 -
Handler code:
3 -
Argument 1: desired background 1 color;
0..15 -
Argument 2: unused
-
Cycled: yes (PAL, 63 cycles)
Usage:
copperEntry(<raster>, c64lib.IRQH_BG_COL_1, <color>, 0)5.4.4. Set background color 2
Changes background color 2.
-
Handler label:
IRQH_BG_COL_2 -
Handler code:
4 -
Argument 1: desired background 2 color;
0..15 -
Argument 2: unused
-
Cycled: yes (PAL, 63 cycles)
Usage:
copperEntry(<raster>, c64lib.IRQH_BG_COL_2, <color>, 0)5.4.5. Set background color 3
Changes background color 3.
-
Handler label:
IRQH_BG_COL_3 -
Handler code:
5 -
Argument 1: desired background 3 color;
0..15 -
Argument 2: unused
-
Cycled: yes (PAL, 63 cycles)
Usage:
copperEntry(<raster>, c64lib.IRQH_BG_COL_3, <color>, 0)5.4.6. Set border and background 0 color uniformly
Changes background color 0 and border color to the same color.
-
Handler label:
IRQH_BORDER_BG_0_COL -
Handler code:
6 -
Argument 1: desired color for border and background 0;
0..15 -
Argument 2: unused
-
Cycled: yes (PAL, 63 cycles)
Usage:
copperEntry(<raster>, c64lib.IRQH_BORDER_BG_0_COL, <color>, 0)5.4.7. Set border and background 0 color separately
Changes background color 0 and border color to another values in single step, the colors are specified as arguments.
-
Handler label:
IRQH_BORDER_BG_0_DIFF -
Handler code:
7 -
Argument 1: desired color for border;
0..15 -
Argument 2: desired color for background 0;
0..15 -
Cycled: yes (PAL, 63 cycles)
Usage:
copperEntry(<raster>, c64lib.IRQH_BORDER_BG_0_DIFF, <border color>, <background color>)5.4.8. Set VIC memory register and VIC memory bank
Changes VIC memory control and VIC memory bank in one step.
-
Handler label:
IRQH_MEM_BANK -
Handler code:
8 -
Argument 1: value for
MEMORY_CONTROLregister -
Argument 2: value for VIC bank (goes to
CIA2_DATA_PORT_A); only two least significant bits are taken, other bits of the data port are preserved -
Cycled: yes (PAL, 63 cycles)
Usage:
copperEntry(<raster>, c64lib.IRQH_MEM_BANK, <memory control>, <vic bank number>)5.4.9. Set VIC mode and memory settings
Changes VIC display mode and memory settings in one step. VIC bank cannot be changed.
-
Handler label:
IRQH_MODE_MEM -
Handler code:
9 -
Argument 1: mode of vic2; for performance reasons the values for two control registers are packed in one byte:
%00010000for Multicolor,%01100000for ECM or Bitmap -
Argument 2: value for
MEMORY_CONTROLregister -
Cycled: yes (PAL, 63 cycles)
Usage:
copperEntry(<raster>, c64lib.IRQH_MODE_MEM, <vic mode>, <memory control>)5.4.10. Jump to custom subroutine
Jumps to custom subroutine that can do whatever you want, i.e. play music. Subroutine must end with rts.
-
Handler label:
IRQH_JSR -
Handler code:
10 -
Argument 1: Low byte of subroutine address
-
Argument 2: High byte of subroutine address
-
Cycled: no
Usage:
copperEntry(<raster>, c64lib.IRQH_JSR, <address, >address)5.4.11. Set hires bitmap mode
Sets up hires bitmap mode using given memory layout and VIC bank. Useful for screen splits using totally different memory locations for VIC chip.
-
Handler label:
IRQH_MODE_HIRES_BITMAP -
Handler code:
11 -
Argument 1: value for
MEMORY_CONTROLregister -
Argument 2: value for VIC bank (goes to
CIA2_DATA_PORT_A); only two least significant bits are taken, other bits of the data port are preserved -
Cycled: yes (PAL, 63 cycles)
Usage:
copperEntry(<raster>, c64lib.IRQH_MODE_HIRES_BITMAP, <memory control>, <vic bank number>)5.4.12. Set multicolor mode
Sets up multicolor bitmap mode using given memory layout and VIC bank. Useful for screen splits using totally different memory locations for VIC chip.
-
Handler label:
IRQH_MODE_MULTIC_BITMAP -
Handler code:
12 -
Argument 1: value for
MEMORY_CONTROLregister -
Argument 2: value for VIC bank (goes to
CIA2_DATA_PORT_A); only two least significant bits are taken, other bits of the data port are preserved -
Cycled: yes (PAL, 63 cycles)
Usage:
copperEntry(<raster>, c64lib.IRQH_MODE_MULTIC_BITMAP, <memory control>, <vic bank number>)5.4.13. Set hires text mode
Sets up hires text mode using given memory layout and VIC bank. Useful for screen splits using totally different memory locations for VIC chip.
-
Handler label:
IRQH_MODE_HIRES_TEXT -
Handler code:
13 -
Argument 1: value for
MEMORY_CONTROLregister -
Argument 2: value for VIC bank (goes to
CIA2_DATA_PORT_A); only two least significant bits are taken, other bits of the data port are preserved -
Cycled: yes (PAL, 63 cycles)
Usage:
copperEntry(<raster>, c64lib.IRQH_MODE_HIRES_TEXT, <memory control>, <vic bank number>)5.4.14. Set multicolor text mode
Sets up multicolor text mode using given memory layout and VIC bank. Useful for screen splits using totally different memory locations for VIC chip.
-
Handler label:
IRQH_MODE_MULTIC_TEXT -
Handler code:
14 -
Argument 1: value for
MEMORY_CONTROLregister -
Argument 2: value for VIC bank (goes to
CIA2_DATA_PORT_A); only two least significant bits are taken, other bits of the data port are preserved -
Cycled: yes (PAL, 63 cycles)
Usage:
copperEntry(<raster>, c64lib.IRQH_MODE_MULTIC_TEXT, <memory control>, <vic bank number>)5.4.15. Set extended background mode
Sets up extended text mode using given memory layout and VIC bank. Useful for screen splits using totally different memory locations for VIC chip.
-
Handler label:
IRQH_MODE_EXTENDED_TEXT -
Handler code:
15 -
Argument 1: value for
MEMORY_CONTROLregister -
Argument 2: value for VIC bank (goes to
CIA2_DATA_PORT_A); only two least significant bits are taken, other bits of the data port are preserved -
Cycled: yes (PAL, 63 cycles)
Usage:
copperEntry(<raster>, c64lib.IRQH_MODE_EXTENDED_TEXT, <memory control>, <vic bank number>)5.4.16. Full raster bar
Generates colorful raster bar across whole screen including border. Color for each subsequent bar line is fetched from $FF terminated array of colors (values 0..15). Because procedure is cycled using busy waiting on raster, a raster time for whole bar will be consumed. Color array can be cycled or modified in any way to get interesting animation effects.
-
Handler label:
IRQH_FULL_RASTER_BAR -
Handler code:
16 -
Argument 1: Low byte of bar color definition address
-
Argument 2: High byte of bar color definition address
-
Cycled: yes (PAL, 63 cycles) - it sucks on badlines however
Usage:
copperEntry(<raster>, c64lib.IRQH_FULL_RASTER_BAR, <address, >address)5.4.17. Background-only raster bar
Generates colorful raster bar across whole background. Color for each subsequent bar line is fetched from $FF terminated array of colors (values 0..15). Because procedure is cycled using busy waiting on raster, a raster time for whole bar will be consumed. Color array can be cycled or modified in any way to get interesting animation effects.
-
Handler label:
IRQH_BG_RASTER_BAR -
Handler code:
17 -
Argument 1: Low byte of bar color definition address
-
Argument 2: High byte of bar color definition address
-
Cycled: yes (PAL, 63 cycles)
Usage:
copperEntry(<raster>, c64lib.IRQH_BG_RASTER_BAR, <colorCycleDef, >colorCycleDef)
...
colorCycleDef:  .byte COLOR_3, LIGHT_RED, RED, LIGHT_RED, YELLOW, WHITE, YELLOW, YELLOW, COLOR_3, $ff
5.4.18. Horizontal scroll
Scrolls screen horizontally using specified amount of pixels.
-
Handler label:
IRQH_HSCROLL -
Handler code:
17 -
Argument 1: value for horizontal scroll register (
0..7) -
Argument 2: unused
-
Cycled: yes (PAL, 63 cycles)
Usage:
copperEntry(<raster>, c64lib.IRQH_HSCROLL, <scroll value>, 0)5.4.19. Mapped horizontal scroll
Applies shallow tech-tech effect (using values 0..7) starting from given raster position. Horizontal scroll value for each corresponding raster line is taken from $FF terminated array of values, each should contain value from 0..7 range. The scroll map can be further modified (i.e. rotated) to achieve interesting animation effects.
-
Handler label:
IRQH_HSCROLL_MAP -
Handler code:
17 -
Argument 1: low byte of scroll map definition address
-
Argument 2: high value of scroll map definition address
-
Cycled: yes (PAL, 63 cycles)
Usage:
copperEntry(<raster>, c64lib.IRQH_HSCROLL_MAP, <hscrollMapDef, >hscrollMapDef)
...
hscrollMapDef:  .fill TECH_TECH_WIDTH, round(3.5 + 3.5*sin(toRadians(i*360/TECH_TECH_WIDTH))) ; .byte 0; .byte $ff
5.5. Examples
5.5.1. Level screen for a TRex-64 game
We would like to display a new level screen for a video game. This screen should play background music, display some information and handle controls to start the game when player is ready. Lets consider the following requirements:
-
Music player should be triggered once per frame.
-
Regular font used on this screen should use "rainbow font" effect using smooth shades of grey.
-
Get ready text should use different shades (yellow and red like fire) which is additionally animated by cycling the rainbow.
-
We need a counter that can be used to calculate delay - this is required to handle keyboard input properly.

The whole screen can be built using following copper table:
copperList:
    copperEntry(10, IRQH_JSR, <playMusic, >playMusic)
    copperEntry(80, IRQH_JSR, <scrollColorCycle2, >scrollColorCycle2)
    copperEntry(124, IRQH_BG_RASTER_BAR, <colorCycle1, >colorCycle1)
    copperEntry(140, IRQH_BG_RASTER_BAR, <colorCycle2, >colorCycle2)
    copperEntry(156, IRQH_BG_RASTER_BAR, <colorCycle1, >colorCycle1)
    copperEntry(245, IRQH_JSR, <dly_handleDelay, >dly_handleDelay)
    copperLoop()
For background raster bar effect we use following arrays defining color cycles:
colorCycle1: .byte GREY, GREY, GREY, LIGHT_GREY, WHITE, WHITE, LIGHT_GREY, GREY, GREY, BLACK, $ff
colorCycle2: .byte BLACK, LIGHT_RED, RED, LIGHT_RED, YELLOW, YELLOW, WHITE, YELLOW, YELLOW, BLACK, $ff
Additionally, the content of colorCycle2 array is rotated using the following code, that is triggered by second entry of the copper table:
scrollColorCycle2: {
  dec z_colorCycleDelay2
  bne !+
    lda #COLOR_CYCLE_DELAY
    sta z_colorCycleDelay2
    rotateMemRightFast(colorCycle2 + 1, 6)
  !:
  rts
}
Note that it is essential, that last byte of the colour cycle entry is the same as the screen colour (BLACK in this case) - this restores bg colour of the screen remainder.
Also note, that "rainbow" font effect requires inverted charset to be used, because rainbow is done via rasterbar effect on background colour.
The Copper 64 main subroutine can be configured in following way:
startCoopper:
  startCopper(
    $03,
    $05,
    List().add(c64lib.IRQH_JSR, c64lib.IRQH_BG_RASTER_BAR).lock())
Main subroutine can be then started multiple time using the following code:
  lda #<copperList
  sta $03
  lda #>copperList
  sta $04
  jsr startCopper
As shown above, the Copper 64 subroutine can be easily reused with different copper lists as long as the same effects are used.
All to be done is to set up copper list address which is in this example stored in addresses $03 and $04.
5.5.2. Title screen for a TRex-64 game
The title screen for the TRex-64 video game uses rainbow fonts, both static and animated as well as fade in/fade out effect on credits/instruction text. The fade effect is also done with background colour, so also inverted charset must be used to hide all parts of the background that shouldn’t be visible.

This screen is implemented with following copper list:
titleScreenCopperList:
        copperEntry(10, IRQH_JSR, <playMusic, >playMusic)
        copperEntry(80, IRQH_JSR, <scrollColorCycle2, >scrollColorCycle2)
    fadeEffectColor:
        copperEntry(166, IRQH_BG_COL_0, BLACK, 0)
        copperEntry(190, IRQH_JSR, <rotateColors, >rotateColors)
        copperEntry(206, IRQH_BG_COL_0, BLACK, 0)
        copperEntry(235, IRQH_BG_RASTER_BAR, <colorCycle2, >colorCycle2)
        copperEntry(250, IRQH_JSR, <dly_handleDelay, >dly_handleDelay)
        copperEntry(261, IRQH_JSR, <handleCredits, >handleCredits)
        copperLoop()
In this example we see that copper list can be modified in runtime.
Here we modify the background colour at the begining of the fade in section.
In another place (handleCredits) we modify this value with simple:
sta fadeEffectColor + 2Just each time you want to fade in or out, we have to change colours according to special fade in / fade out array of colours.
5.5.3. Supporting both PAL and NTSC
We all know that NTSC on C64 is hard, because there are far less raster lines per frame (due to the fact that VIC-II does 60Hz vs 50Hz in PAL). But what is even harder and more awkward: while PAL version has 0 raster line at the very top of the screen, the raster 0 on NTSC is near at the bottom.
For PAL we do have 312 raster lines, and v-blank starts at 300 (the very bottom of the visible screen area). for NTSC we have 263 raster lines, v-blank starts at line 13 (so raster lines 0 to 12 are visible at the very bottom of the screen). So, lets assume we would like to set up an interrupt at the line 251 (PAL). To have this interrupt to be triggered in exactly the same place on NTSC, we do need to set it up in line 1.
Therefore in order to make our copper list work equally well on PAL and NTSC we do have to:
-
Detect which machine are we running on (PAL / NTSC).
-
Modify copper list accordingly (change 251 to 1 if on NTSC).
Let’s consider following copper list:
ingameCopperList:
    copperEntry(DASHBOARD_Y + 20, IRQH_JSR, <upperMultiplex, >upperMultiplex) // 50 + 20 = 70
    copperEntry(77, IRQH_JSR, <playMusicIrq, >playMusicIrq)
  scrollCode:
    copperEntry(103, IRQH_JSR, <scrollBackground, >scrollBackground)
  switchPagesCode:
    copperEntry(280, IRQH_JSR, <switchPages, >switchPages)
    copperLoop()
We see that the last raster line is way beyond of the NTSC display capabilities. In fact, IRQ at 280 will never be triggered on NTSC machine. In short, the following raster table will not work there. We have to detect NTSC and modify the table accordingly.
startIngameCopper: {
  lda #<ingameCopperList
  sta z_displayListPtr
  lda #>ingameCopperList
  sta z_displayListPtr + 1

  lda z_ntsc
  bne ntsc
  jmp !+
  ntsc: {
    // for NTSC we want to change raster counter for last IRQ handler (switch pages)
    lda #8
    sta switchPagesCode + 1
    lda switchPagesCode
    and #%01111111
    sta switchPagesCode
  }
  !:
    jsr startCopper
  rts
}
Note that we have to change both byte 0 and 1 of the copper list entry - this is because we have to also clear bit 9 of the raster counter, which is stored in control byte.
To detect NTSC we can use the following code:
setNTSC: {
  lda #1
  sta z_ntsc
  rts
}

detectNTSC: {
  lda #0
  sta z_ntsc
  detectNtsc(0, setNTSC)
  rts
}
6. Contribute
6.1. Coding standards
6.2. Branching and versioning strategy
7. Library reference
| This section is incomplete and will be rewritten soon. |
8. Privacy disclaimer
8.1. How do we process your data
This website is powered by AsciiDoctor and is hosted on GitHub/GitHub Pages.
AsciiDoctor is not collecting or processing user data in any form.
GitHub however, as any other hosting company, can have full insight in visitor data, like connecting IP addresses, visited pages, etc. Note that Github is not known to actively profile visitors. By using a VPN you can (try to) prevent this.
8.2. Google Analytics
This website uses Google Analytics. This happens only if you accept third party cookies. I have configured Google Analytics so that IP addresses are anonymized.
Use the following option to grant or revoke collecting data and using cookies.
Enable Google Analytics